Creating Your First Schedule
Learn how to create a complete employee schedule from scratch, including setting up shifts, assigning staff, and publishing to your team.
Before You Start
Make sure you have:
- Created your team
- Invited team members
- Manager or Owner permissions
Understanding the Schedule View
Before creating your schedule, let's familiarize you with the schedule interface:
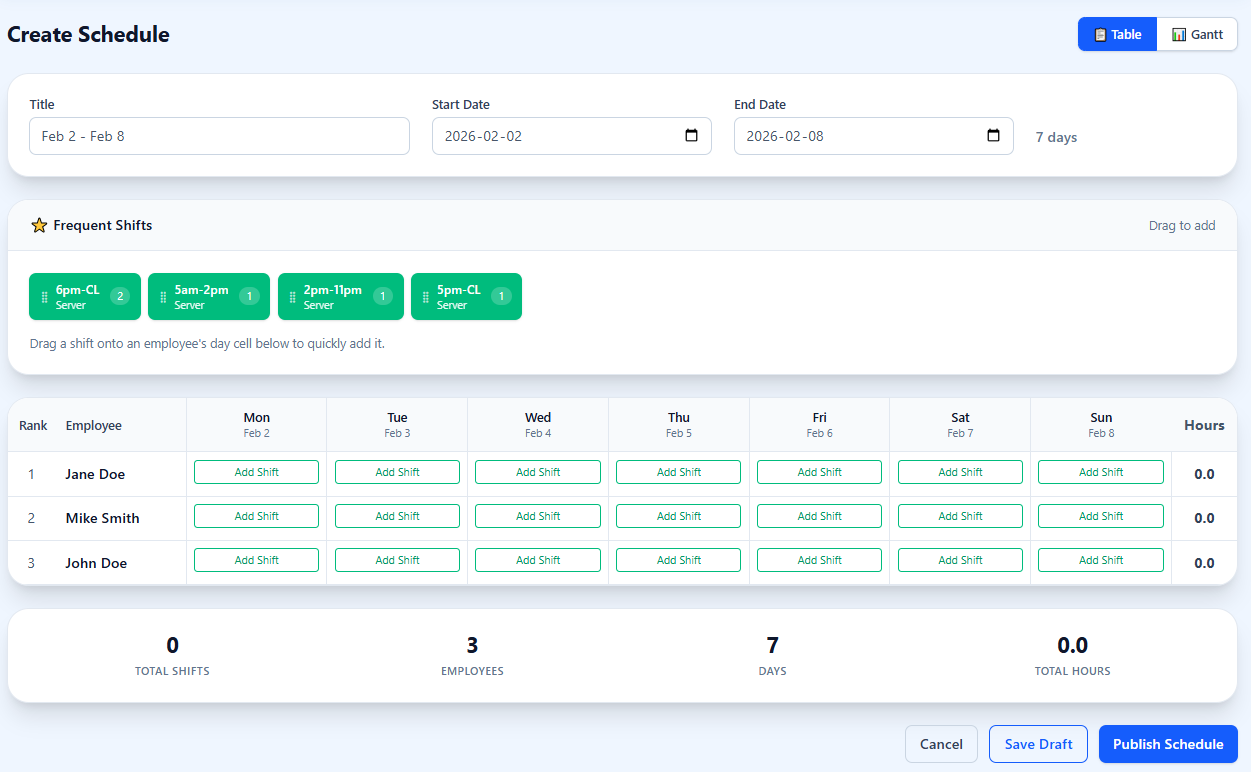
📅 Schedule Header
Set the title, start date, and end date for your schedule
⭐ Frequent Shifts
Drag commonly used shifts onto the grid to quickly add them
👥 Employee Grid
Shows employees by rank with days across and hours totals
📊 Statistics Footer
View total shifts, employees, days, and hours at a glance
Step-by-Step Guide
Step 1: Navigate to Schedules
From your dashboard, click "Schedules"in the main navigation. You'll see a list of your schedules.

Step 2: Create Schedule
Click Create Schedule button and the new schedule screen will open. Use the date picker in the toolbar to select the week you want to schedule.
Step 3: Create Shifts
There are two ways to create shifts:
Option A: Click and Drag
- 1. Click on a shift from the Frequent Shifts panel
- 2. Drag to an available day
- 3. Release to create the shift
Option B: Click Add Shift
- 1. Click any cell in the grid
- 2. Set start time, end time, and details
- 3. Click "Add"
Step 4: Configure Shift Details
When creating or editing a shift, you can set:
| Time | Start and end times (e.g., 9:00 AM - 5:00 PM) |
| Position | Role required (e.g., Server, Cook, Cashier) |
Step 5: Publish the Schedule
When you're satisfied with the schedule, it's time to publish:
- 1Click the "Publish Schedule" button at the bottom of the screen
What Happens After Publishing?
- All assigned employees receive notifications via their preferred method
- The schedule appears in each employee's mobile app and dashboard
- Shifts are automatically added to employees' personal calendars (if synced)
- Shift swap requests can begin (if enabled)
Pro Tips
Use Templates
If your schedule is similar week to week, save it as a template for future use.
Collect Availability First
Have employees set their availability before you create the schedule to avoid conflicts.
Schedule in Batches
Create the entire week's worth of shifts before assigning employees for better optimization.
Need help creating your first schedule?
Contact Support